Parsing Values in Arduino
Sections
- Description
- Arduino Circuit
- Button State Change
- Using the Map Function
- Constrain
- Averaging
- Resources
- Further Resources
Description
This page will cover some brief strategies for filtering or transforming data before you send it to TouchDesigner (or any other software). TouchDesigner has its own ways of filtering and transformming data, however there may be times when it is preferable or necessary to filter values from the microcontroller first.
Materials and Libraries
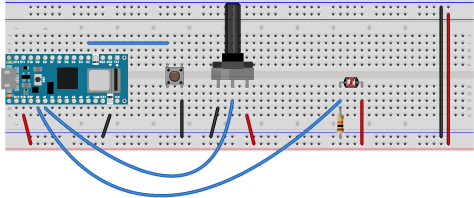
We will use the Arduino Nano 33 IoT, a pushbutton, a potentiometer, and a light sensor, however these strategies can be applied to other microcontrollers and other sensors as well.
- Arduino Nano 33 IoT
- Arduino IDE
- Breadboard, USB cable, Jumper wires, Push button, Potentiometer, Light sensor
Arduino Circuit:
Button State Change
When reading a button, you may want to write code that does something when the button is pressed. If you use the code below the button will Serial.println() multiple times because it is being called in the loop() which will repeat the Serial.println() function as long as the button press is detected, even a quick press will trigger multiple Serial.println() calls.
int currentButtonState;

void setup() {
    Serial.begin(9600);
    pinMode(2, INPUT_PULLUP);
}

void loop() {
    // read the button's current state
    currentButtonState = digitalRead(2);
    // if its currently zero, its being pressed
    if (currentButtonState == 0) {
        Serial.println("Pressed");
    }
    // if its currently one, its not being pressed
    if (currentButtonState == 1) {
        Serial.println("Released");
    }

}
There will be times when you will want the button press to trigger an action only one time per press and re-trigger only after you release the button and press again. This is common if you are counting presses or sending any kind of communication (MIDI, API calls, OSC, etc)
Since the Arduino loop runs in real time we must use a variable to store its previous state, and then compare the previous state to the current state. If they are different, then it means an interaction occurred (either a press or a release).
Step by Step:
Make global variables for the current and previous states:
int currentButtonState;
int prevButtonState;
In setup() give the previousButtonState an initial value:
    void setup() {
        prevButtonState = digitalRead(2);
    }
In loop() read currentButtonState using digitalRead()
currentButtonState = digitalRead(2);
Then compare previousButtonState to currentButtonState. If there is a difference, it means it has changed state. Update previousButtonState to reflect the change that occurred.
if (prevButtonState != currentButtonState) {
     prevButtonState = currentButtonState;
}
Lastly, once we detect a change, do something when the button is either pressed down or released
if (prevButtonState != currentButtonState) {

    // if its currently zero, its been pressed
    if (currentButtonState == 0) {
        Serial.println("Pressed");
    }

    // if its currently one, its been released
    if (currentButtonState == 1) {
        Serial.println("Released");
    }

    // update the previous value to reflect the change
    prevButtonState = currentButtonState;
}
Full code:
int currentButtonState;
int prevButtonState;

void setup() {
    Serial.begin(9600);
    pinMode(2, INPUT_PULLUP);
    // set an initial reading to compare with current reading
    prevButtonState = digitalRead(2);
}

void loop() {
    // read the button's current state
    currentButtonState = digitalRead(2);

    if (prevButtonState != currentButtonState) {
        // if its currently zero, its been pressed
        if (currentButtonState == 0) {
            Serial.println("Pressed");
        }
        // if its currently one, its been released
        if (currentButtonState == 1) {
            Serial.println("Released");
        }
        // update the previous value to reflect the change
        prevButtonState = currentButtonState;
    }
}
Map Function
The arduino map() function takes a variable and converts the value of that variable from one range to another. For example, the potentiometer’s values can range from 0 to 1023. However if we wanted to use those values to control an LED’s brightness, we would need to output a range from 0 to 255 and no bigger.
Create a variable to store the sensor value and use analogRead() to read and return the sensor value:
int potentiometer = analogRead(A0);
Note the variable name is potentiometer because I’m using a potentiometer in this example. And I’ve written analogRead() as analogRead(A0) because the potentiometer is connected to the Arduino’s A0 pin.
Next use the map() function to store a converted value. Define a new variable ledValue to store the mapped value. Next assign ledValue a mapping. The map function requires 5 arguments.
- 1st: the variable you want to convert
potentiometer - 2nd: the variable’s minimum value
- 3rd: the variable’s maximum value
- 4th: the new minimum value
- 5th: the new maximum value
I want to map the potentiometer, which has a range between 0 - 1023, to output a proportional range between 0 - 255
int ledValue = map(potentiometer, 0, 1023, 0, 255);
Full Code:
void setup() {
    Serial.begin(9600);
}

void loop() {
    int potentiometer = analogRead(A0);
    int ledValue = map(potentiometer, 0, 1023, 0, 255);

    Serial.println(ledValue);
}
Make sure you observe your sensor’s actual range and use that as your input values. Double check your desired output range. For example MIDI values range from 0-127, and TouchDesigner defaults to normalized values 0-1.
Constrain
If your sensor is noisy – values change slightly when you don’t interact with the sensor– or the observed values don’t extend to the full 0-1023 range, theres a chance that your sensor may overflow beyond the boundries of you mapped output. To prevent this overflowing, you can use the constrain() function to ignore values that are outside of your specified boundries.
For example if we look at the light sensor, the values do not extend all the way from 0-1023, but because lighting conditions can change, its possible that the values might extend beyond the boundries we set, and if that happens a mapped value would also extend beyond the defined boundries.
The constrain() function cuts off any numbers that fall outside of the defined boundries. So in the code below, the following line ensures that the ledValue remains between 0 and 255
int ledValue = constrain(ledValue, 0,255);
Full Code:
void setup() {
    Serial.begin(9600);
}

void loop() {
    int lightSensor = analogRead(A1);
    int ledValue = map(lightSensor, 200, 900, 0, 255);
    int ledValue = constrain(ledValue, 0,255);

    Serial.println(ledValue);
}
Averaging
int potentiometerAverage;
int avgSamples = 25; // try different numbers

void setup() {
    Serial.begin(9600);
}

void loop() {

    int total = 0;

    for (int i = 0; i < avgSamples; i++) {
        total += analogRead(A0);
    }

    potentiometerAverage = total / avgSamples;

    Serial.println(potentiometerAverage);
}
Analog State Change with Noise Reduction
Similar to our Button State Change. There will be times when you want a sensor to trigger something only when the sensor has changed significantly. D
int noise = 15;
int prevPot;

void setup() {
    Serial.begin(9600);
    prevPot = analogRead(A0);
}

void loop() {
    // reset total each loop
    int pot = analogRead(A0);

    if (abs(prevPot - pot) > noise) {
        Serial.println(pot);
        prevPot = pot;
    }
}